How To Make Netflix Video Player in Swift
Netflix is used around the world to watch their favorite videos and movies.
The company has exploded in growth over the last couple of years, becoming one of the major players in the video space. In this tutorial, we’re going to look at how to recreate the Netflix video player on iOS.
Video Player
The Netflix video player consists of multiple controls as well as the video playing in the background:

Create a new project in Xcode. Remove the storyboard and replace it with a view controller. If you don’t know how to do that read this.
The first thing we’ll need to create is the video player, the view that plays the actual video. In my main view controller, I’ll create a new videoPlayerView:
import UIKit

class MainViewController: UIViewController {
    let videoPlayerView = UIView()

    override func viewDidLoad() {
        super.viewDidLoad()
        videoPlayerView.backgroundColor = UIColor.red
        view.addSubview(videoPlayerView)
    }
}
If we run our application, you’ll notice we don’t see our new videoPlayerView, even though we made the background color red in the code above. This is because we haven’t set constraints on the view, so it’s not clear where this view should be.
Let’s add constraints to pin our videoPlayerView to the view of the MainViewController.
override func viewDidLoad() {
    super.viewDidLoad()
    videoPlayerView.backgroundColor = UIColor.red
    videoPlayerView.translatesAutoresizingMaskIntoConstraints = false
    let topConstraint = NSLayoutConstraint(item: videoPlayerView, attribute: .top, relatedBy: .equal, toItem: view, attribute: .top, multiplier: 1, constant: 0)
    let bottomConstraint = NSLayoutConstraint(item: videoPlayerView, attribute: .bottom, relatedBy: .equal, toItem: view, attribute: .bottom, multiplier: 1, constant: 0)
    let leadingConstraint = NSLayoutConstraint(item: videoPlayerView, attribute: .leading, relatedBy: .equal, toItem: view, attribute: .leading, multiplier: 1, constant: 0)
    let trailingConstraint = NSLayoutConstraint(item: videoPlayerView, attribute: .trailing, relatedBy: .equal, toItem: view, attribute: .trailing, multiplier: 1, constant: 0)

    view.addSubview(videoPlayerView)
    view.addConstraints([topConstraint, bottomConstraint, leadingConstraint, trailingConstraint])
}
We add four constraints, pinning each of the four sides of our viewPlayerView to the it’s superview. Here’s what your app should look like now:

The Netflix player only plays in landscape. Let’s make our app do the same. Add this to the bottom of your main view controller class:
override var supportedInterfaceOrientations: UIInterfaceOrientationMask {
    return .landscapeLeft
}
Play Video From URL
Now let’s make our videoPlayerView play a video. I’m going to create a function that setups and plays our video:
func setupVideoPlayer() {
    guard let url = URL(string: "http://commondatastorage.googleapis.com/gtv-videos-bucket/sample/BigBuckBunny.mp4") else {
        return
    }
    player = AVPlayer(url: url)

    let playerLayer = AVPlayerLayer(player: player)
    playerLayer.frame = videoPlayerView.bounds;
    videoPlayerView.layer.addSublayer(playerLayer)
    player?.play()
}
This function does several steps:
- Grab video from the URL. We’re using the big buck bunny video by blender studios.
- Load player into a playerr layer.
- Set the player layer frame to match the
videoPlayerViewbounds. - Add the layer to the
videoPlayerView - Finally play the video.
We need to also import AVFoundation:
import AVFoundationAnd create a player variable:
var player: AVPlayer?Awesome, now call the setupViewPlayer() function in viewDidAppear. Not viewDidLoad, this will cause only the audio to play.
override func viewDidAppear(_ animated: Bool) {
    super.viewDidAppear(animated)
    setupVideoPlayer()
}
Congrats, we’ve now got a video playing. Time to add some controls.
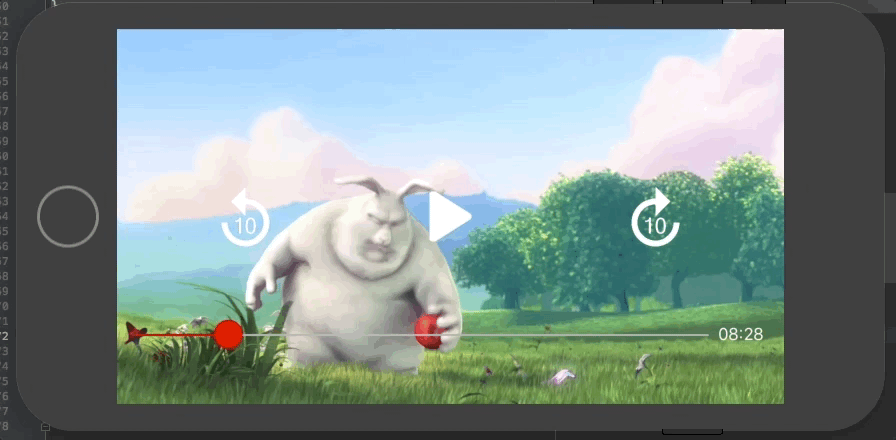
Player Controls
Let’s take a look at the controls again:

We’ll build these controls in the following order:
- Play/Pause Button
- Progress bar
- Time remaining text
- Skip forward/backward buttons
- Video Title
We’ll cover the other controls such as Chromecast button, subtitles, episode lists and the close button in the next tutorial.
Play Pause Button
Let’s start with the play pause button. Open up your MainViewController.xib in the interface builder. Change the orientation to landscape:

Open the object library in the top right corner or use keyboard shortcut CMD+Shift+L. Search for button and drag it onto your view.

Center your button in the middle and setup constraints to make sure it stays there. To do this, hold CTRL on your keyboard, click your button and drag it to the super view.

You’ll want to do this twice, adding “Center Horizontally in Safe Area” and “Center Vertically in Safe Area”.

Your document outline should look like this afterwards:

Now if we run our application, we won’t be able to see our button because it’s hidden behind our video player. Here’s how it looks in the visual debugging tool. You can open this tool by going to Debug > View Debugging > Capture View Hierarchy or by clicking the icon in the debug bar that has the tool tip “Debug View Hierarchy”.

We need to bring our video view to be behind our player controls. To do this simple call sendSubviewToBack at the end of viewDidLoad()
view.sendSubviewToBack(videoPlayerView)I enlarged the button text for the below screen shot:

Ok now to change our button to the play sign (or pause sign). Let’s add some images to our Assets.xcassets. Download the images here.
Drag those images into your Assets:

Now open back up your main view controller and click on your play button. In the attributes inspector (CMD+Option+4), you can set the button image to our play sign. I also changed the background to black, so its easier to see our button:

Obviously the play sign is too large here, so we’re going to set constraints on the size of our button. I’m going to make the size of the button 50x50:

I also removed the text from the button. Run your app and you should see this:

This is great … but the button doesn’t actually do anything yet! We need to make the video play and pause when it is tapped.
To do this we need to create an IBAction. Open up your main view controller xib and then open your swift file in the assistant editor. You can doing this by holding option and clicking the swift file in the project navigator.
Select your play button and open the Connections Inspector with the keyboard shortcut CMD+Option+6. Drag the Touch Up Inside connection into your code:

I’m going to name my IBAction playPauseTapped and make it have the type UIButton:

Let’s also drag our button in our swift file and create an IBOutlet. Hold CTRL and drag the button into your code:

I’ll call my button playPauseButton with type UIButton:
@IBOutlet weak var playPauseButton: UIButton!Now let’s create a swift extension to check whether the player is currently playing video or not.
extension AVPlayer {
    var isPlaying: Bool {
        return rate != 0 && error == nil
    }
}
This code checks the current rate is not zero and if there’s no error. If both these conditions are true, the video is currently playing. Now to use this extension in our playPauseTapped function:
@IBAction func playPauseTapped(_ sender: UIButton) {
    guard let player = player else { return }
    if !player.isPlaying {
        player.play()
        playPauseButton.setImage(UIImage(named: "pause"), for: .normal)
    } else {
        playPauseButton.setImage(UIImage(named: "play"), for: .normal)
        player.pause()
    }
}
First we check that player isn’t nil by using a guard statement. Then if the player is paused, we resume it and change the icon to a pause button. If the player is playing, we change the icon to play and pause the video. I’ll also delete the player?.play() from our setupVideoPlayer() function.
Let’s see it in action:
Awesome! We’ve got our first player control completed.
Progress Bar
The next thing we’ll want to create is the progress bar in the lower third of the screen. This allows the user to view how much time has elapsed and how much time is remaining the video. It also allows the user to scrub and jump to a certain part of the video.
In iOS we’ll use a UISlider view to create this experience. Open up the object library (keyboard shortcut: CMD + Shift + L) and search for slider. Drag it onto your view.

Here are the constraints I will add to our slider:

To add this constraints, hold CTRL, click and drag the slider to the superview. Do this 3 times for the trailing, leading and bottom constraint.

Once you’ve added the necessary constraints your view should look like this:

Go into the Attributes Inspector and change the Thumb Tint and the Tint to the color FF0000.

Now our slider looks just like the Netflix player one. It’s time to make this slider do something when it is used.

Track Video Progress In UISlider
First let’s make sure the video slider updates while the video is playing. Add this line to the end of your setupVideoPlayer() function:
let interval = CMTime(seconds: 0.01, preferredTimescale: CMTimeScale(NSEC_PER_SEC))
timeObserver = player?.addPeriodicTimeObserver(forInterval: interval, queue: DispatchQueue.main, using: { elapsedTime in
    self.updateVideoPlayerSlider()
})
This adds a watcher that will update our player periodically (but very rapidly). Of course you’ll need to define timeObserver as a property of this view controller:
var timeObserver: Any?Next, let’s create our updateVideoPlayerSlider function.
func updateVideoPlayerSlider() {
    guard let currentTime = player?.currentTime() else { return }
    let currentTimeInSeconds = CMTimeGetSeconds(currentTime)
    progressSlider.value = Float(currentTimeInSeconds)
    if let currentItem = player?.currentItem {
        let duration = currentItem.duration
        if (CMTIME_IS_INVALID(duration)) {
            return;
        }
        let currentTime = currentItem.currentTime()
        progressSlider.value = Float(CMTimeGetSeconds(currentTime) / CMTimeGetSeconds(duration))
    }
}
This function gets the current time and then updates our slider value accordingly. The last thing we need to do is create an IBOutlet for our progressSlider. Hold CTRL, then click and drag the progress bar into your swift code.
@IBOutlet weak var progressSlider: UISlider!Awesome, now our progress slider tracks the progress in the video:

Seeking and jumping with the progress slider
The next thing we’ll need to do is make seeking or jumping using the progress bar work. Currently, if you try to move the slider, it will just jump back into place where the video’s current position is.
We’ll need to create a IBAction. Select the UISlider in your interface builder and open up its Connection Inspector (CMD+Option+6). Drag the Value Changed into your Swift code:

I’m going to it playbackSliderValueChanged and use type UISlider. Next I’m going to use the follow code which will calculate the time for our player to seek to.
@IBAction func playbackSliderValueChanged(_ sender:UISlider)
{
    guard let duration = player?.currentItem?.duration else { return }
    let value = Float64(playbackSlider.value) * CMTimeGetSeconds(duration)
    let seekTime = CMTime(value: CMTimeValue(value), timescale: 1)
    player?.seek(to: seekTime )
}
Run your app now, you should be able to seek to anywhere in the video.
Time Remaining Text
Now the next step is to create the time remaining text. This appears just to the right of the progress bar. We’ll use a UILabel to make this work. Open up the object library and find the label object:

Drag that label object to the right of your slider and set constraints:

Now we need to update that label text to what the video is playing. Here’s the code that we’ll use to calculate the remaining time in the video:
// Update time remaining label
let totalTimeInSeconds = CMTimeGetSeconds(duration)
let remainingTimeInSeconds = totalTimeInSeconds - currentTimeInSeconds

let mins = remainingTimeInSeconds / 60
let secs = remainingTimeInSeconds.truncatingRemainder(dividingBy: 60)
let timeformatter = NumberFormatter()
timeformatter.minimumIntegerDigits = 2
timeformatter.minimumFractionDigits = 0
timeformatter.roundingMode = .down
guard let minsStr = timeformatter.string(from: NSNumber(value: mins)), let secsStr = timeformatter.string(from: NSNumber(value: secs)) else {
    return
}
timeRemainingLabel.text = "\(minsStr):\(secsStr)"
We’ll add this to the bottom of our update slider function and rename that function updateVideoPlayerState(). We’ll rename the function in our periodic observer block too. Here’s the complete function:
func updateVideoPlayerState() {
    guard let currentTime = player?.currentTime() else { return }
    let currentTimeInSeconds = CMTimeGetSeconds(currentTime)
    progressSlider.value = Float(currentTimeInSeconds)
    if let currentItem = player?.currentItem {
        let duration = currentItem.duration
        if (CMTIME_IS_INVALID(duration)) {
            return;
        }
        let currentTime = currentItem.currentTime()
        progressSlider.value = Float(CMTimeGetSeconds(currentTime) / CMTimeGetSeconds(duration))

        // Update time remaining label
        let totalTimeInSeconds = CMTimeGetSeconds(duration)
        let remainingTimeInSeconds = totalTimeInSeconds - currentTimeInSeconds

        let mins = remainingTimeInSeconds / 60
        let secs = remainingTimeInSeconds.truncatingRemainder(dividingBy: 60)
        let timeformatter = NumberFormatter()
        timeformatter.minimumIntegerDigits = 2
        timeformatter.minimumFractionDigits = 0
        timeformatter.roundingMode = .down
        guard let minsStr = timeformatter.string(from: NSNumber(value: mins)), let secsStr = timeformatter.string(from: NSNumber(value: secs)) else {
            return
        }
        timeRemainingLabel.text = "\(minsStr):\(secsStr)"
    }
}
Of course we’ll also need to an IBOutlet for our UILabel:
@IBOutlet weak var timeRemainingLabel: UILabel!Awesome, if you run your app now you can see the label updating in real time. It works even if you seek to a different part of the video.

Now time to move onto the other buttons.
Skip Forward And Backward
The last buttons we’ll cover in this article are the skip forward and backward buttons. Download the images for these assets here and then drag them into your Assets.xcassets in Xcode.
Open up your object library and drag two buttons onto the screen. I’ve set up four constraints for each of my buttons. I clicked the tie-fighter looking icon and set my size constraints first; width and height. Next, I held down ctrl then clicked and dragged to the play button.
I added Align Center Y to the play pause button. Then I adding a leading (or trailing) constraint of 150 to set the horizontal spacing.

When you run your application it should look something like this:

Now we need to make these jump forward and backward buttons work properly. Open up your swift file in the assistant editor (hold opt and click it in the project navigator).
Now select your button in the XIB and open up the Connections Inspector (CMD + Option + 6) and drag the Touch Up Inside into your swift code.


Do the same for the backward button. Your code should now include these two IBAction functions:
@IBAction func jumpForward(_ sender: UIButton) {

}

@IBAction func jumpBackward(_ sender: UIButton) {

}
Let’s fill in these functions.
@IBAction func jumpForward(_ sender: UIButton) {
    guard let currentTime = player?.currentTime() else { return }
    let currentTimeInSecondsPlus10 =  CMTimeGetSeconds(currentTime).advanced(by: 10)
    let seekTime = CMTime(value: CMTimeValue(currentTimeInSecondsPlus10), timescale: 1)
    player?.seek(to: seekTime)
}
The above function does the following:
- First we get the current time of the player and ensure it isn’t nil using a guard statement
- Then we convert that value into seconds and advance it by 10.
- We convert the time in seconds back to a CM time
- Finally we tell our player to seek to that time
The jumpBackward function will be quite similar, but instead of adding 10 seconds we will subtract 10 seconds.
@IBAction func jumpBackward(_ sender: UIButton) {
    guard let currentTime = player?.currentTime() else { return }
    let currentTimeInSecondsMinus10 =  CMTimeGetSeconds(currentTime).advanced(by: -10)
    let seekTime = CMTime(value: CMTimeValue(currentTimeInSecondsMinus10), timescale: 1)
    player?.seek(to: seekTime)
}
Now run the application and both of the buttons should work, allowing you to jump forward or backward.
Video Title
The next thing we’ll do is probably the simplest of the player controls. It’s time to add a title to our video! This will just be a simple UILabel. You probably know how to do that at this point, but I’ll show you just incase.
Open up your interface builder and then drag the UILabel from the object library to the top of the screen.

Then add two constraints, the top space to the safe area and center horizontally in safe area. You can do this by selecting your label, holding CTRL, click and drag your label to the main view.

Here’s what my constraints look like on my label:

Change the text of your title and the font to white in the Attribute Inspector (CMD + Option + 4):

Now you have a title :)
Fade Controls
Ok, so you have all your main controls done, but how do we make them fade away when you just want to watch the video? We’ll use a timer to detect when the user is inactive for a period of time and fade the controls.
Let’s make a timer property:
var timer: Timer?Now we’ll create a restartTimer function that we’ll call every time we want to restart the clock:
func resetTimer() {
    timer?.invalidate()
    timer = Timer.scheduledTimer(timeInterval: 10.0, target: self, selector: #selector(hideControls), userInfo: nil, repeats: false)
}
This timer calls a hideControls function after 10 seconds. Let’s create the hideControls function:
@objc func hideControls() {
    playPauseButton.isHidden = true
    progressSlider.isHidden = true
    timeRemainingLabel.isHidden = true
    forwardButton.isHidden = true
    rewindButton.isHidden = true
    titleLabel.isHidden = true
}
You have to have created IBOutlet properties. You can do this by CTRL, click - dragging into your swift file. Here are all my IBOutlets:
@IBOutlet weak var titleLabel: UILabel!
@IBOutlet weak var playPauseButton: UIButton!
@IBOutlet weak var timeRemainingLabel: UILabel!
@IBOutlet weak var progressSlider: UISlider!
@IBOutlet weak var forwardButton: UIButton!
@IBOutlet weak var rewindButton: UIButton!
Now call this resetTimer() in viewDidAppear:
override func viewDidAppear(_ animated: Bool) {
    super.viewDidAppear(animated)
    setupVideoPlayer()
    resetTimer()
}
Now your controls will hidden after 10 seconds. But wait! How do we get them back? When the user taps the screen, the controls should re-appear.
To do this we’ll add a gesture recognizer to our whole screen in our viewDidAppear.
let tapGesture = UITapGestureRecognizer(target: self, action: #selector(toggleControls))
view.addGestureRecognizer(tapGesture)
Now we need to create a toggleControls function:
@objc func toggleControls() {
    playPauseButton.isHidden = !playPauseButton.isHidden
    progressSlider.isHidden = !progressSlider.isHidden
    timeRemainingLabel.isHidden = !timeRemainingLabel.isHidden
    forwardButton.isHidden = !forwardButton.isHidden
    rewindButton.isHidden = !rewindButton.isHidden
    titleLabel.isHidden = !titleLabel.isHidden
    resetTimer()
}
Now your controls will hide and show every time you tap the screen. Those controls will also fade away after 10 seconds of user inactivity.

Eddy Chung
Similar Posts
- 10 Steps To Become An iOS Developer With No Experience
- Best Programming Languages To Learn For Mobile App Development
- Can you build an iOS app without an iPhone or iPad?
- Can I Develop iOS Apps On Windows?
- Colors & Font Styles In Xcode - Lesson 2
- Explanation & Solution for 'fatal error: unexpectedly found nil while unwrapping an Optional value'
- How long does it take to learn iOS development?
- Hello (SwiftUI) World - Beginner Tutorial For SwiftUI
- How To Make an iOS App For Beginners - Lesson 1 Hello World
- How To Make Gmail iOS App in Swift

The Complete iOS App Development Bootcamp
Disclosure: This website may contain affiliate links, meaning when you click the links and make a purchase, we receive a commission.