How To Make An iOS Game - Beginners Tutorial
In this tutorial, we’re going to build a simple iOS card game from scratch.
This tutorial doesn’t assume any existing coding knowledge and is a great starting point for beginners to iOS development.
What Are We Building
We will build a high low card game during this tutorial. The concepts you’ll learn in the tutorial are fundamental to building any iOS apps. Learning these techniques will give you a strong foundation to build iOS apps from.
The player has to guess whether the next card will be higher or lower. If the player guesses correctly, they are rewarded a point. If they’re wrong, the game is over.
Tip
Learning by doing is the best & fastest way to learn iOS development, so please follow along on your own computer.
The tutorial is divided into the following sections:
- Setup Xcode will teach you how to setup your development environment.
- Building the user interface will teach you how to build user interfaces in iOS development.
- Swift Programming will teach you the basics of Swift for iOS development.
- Adding Additional Features will add some extra features to our game.
It isn’t necessary to complete the entire tutorial at once. Get as far as you can - you can finish the rest at your own convenience.
We recommend typing out code by hand to build muscle memory and understanding. Copying & pasting code is fine if you already understand the concepts.
Prerequisites
A mac computer is all that is required. An iPhone is nice to have, but not necessary. Most Mac machines will do fine.
If you have a Windows machine, we recommend reading this guide to get set up.
Setup Xcode
Install Xcode
Download Xcode from the App Store on your Mac. Have a Windows computer? Read this Windows Guide. Already have Xcode installed? Click here.
You can open up the App Store by clicking the Apple icon in the top left hand corner of your screen and selecting App Store.

Search for Xcode using the search bar in the top right of the App Store.

Click and install Xcode.
Create New Xcode Project
Once you’ve installed Xcode, open it up and you’ll see a splash screen like this:

Select Create a new Xcode project. Xcode will then ask you to choose a template.
Select Single View App and click next.

Name your app and click next. You can create this project anywhere on your computer.

Your Xcode should look similar to this once you’ve completed the project.

Building The User Interface
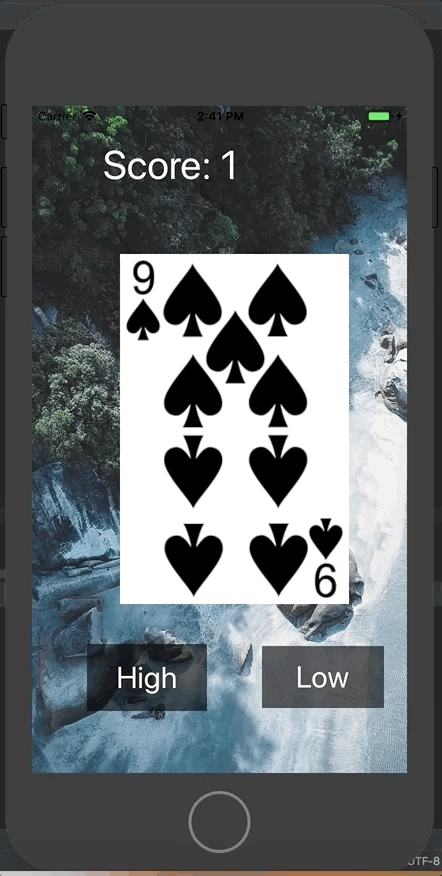
Now that you’ve created your Xcode project, let’s begin building the user interface. As a reminder we’re looking to build this simple high-low card game:

The first thing we’ll need to do is open our main storyboard in Xcode’s interface builder. To do this, click on the main storyboard in the left hand panel. If you don’t see it, press CMD+1 on your keyboard.

Interface Builder
There’s a lot going on this screen now. There are so many different panels and sections when you open up a storyboard. These visual tools are called Xcode’s interface builder. Although it may seem intimidating - you will become comfortable with this overtime.
Let’s start with something simple, changing the background color of your application.
Click on the main view in your storyboard. It looks like a large white rectangle. You will notice that the view becomes selected in your outline pane as well.

Attributes Inspector
On the right hand side of your screen you have the inspector pane. It contains a couple of different tabs. To change the background color we’ll need to open the third pane, the Attributes Inspector. Click on it or use the keyboard short cut CMD+Option+4.

Here we can modify the different attributes of our selected view. For now we’re going to change the background color of our view. Select the different color in the Background option.

Save the file using the keyboard shortcut CMD+S.
Running Your iOS App
We’re going to learn how to run our iOS application on a simulator.
In the top left corner of Xcode, we can see a play button, a stop button, the name of your project and a simulator.

In the above screen shot, I have the iPhone 7 simulator selected. You can change the simulator by clicking on it and choosing another one.

Now click the big play button and your simulator should start up. Once it’s boots, it will load your application and you’ll see something like this:

Try it yourself
Try changing the background color and re-running your application.
Adding A Background Image
Let’s add a background image to our app. I’m going to be using this image:

To add this image to our background, we’ll need to create an image view.
Open up the objects library by clicking square within a circle button in the top right corner of Xcode. You can also use the keyboard shortcut CMD+Shift+L.
Search for the image view object.

Click & drag the image view into your main view. Resize it so it fills the entire main view.

Now we’ll need to add the background image to our Xcode project. Click on Assets.xcassets in the Project Navigator pane. If your Project Navigator is not open, you can open it with the keyboard short CMD+1
Click the plus sign button near the bottom of your screen once your Assets.xcassets is selected.

Choose New Image Set. Drag the image from Mac Finder into one of the slots.

Now open up the attribute inspector pane (CMD+Option+4) and change the Scales to Single Scale.

Let’s rename this image by clicking on it’s name. I’ll rename it background-image.

Open backup the Main.storyboard file. Select the image view and go into the attributes inspector (CMD+Option+4). Select the image to be background-image. Set the content mode to Aspect Fill.

The last step in setting the background image to setup constraints for our image view. Constraints are rules that tell iOS where to draw certain views.
Click the tie-fighter button near the bottom of the interface builder. Make sure each of the constraints are set to 0. Then select each of the constraint lines so they highlight bright red. Select Add Constraints.

Run your app by clicking the play button or using the keyboard shortcut CMD+R.

Adding Buttons
Let’s create our buttons for High and Low. Open up the object library again (CMD+Shift+L). Search for button and drag two buttons onto your main view.


Now let’s edit our two buttons so they’re more visible. I’ll change the background color to black with 60% opacity and the font color to white. We’ll set these in the attribute inspector (CMD+Option+4). Make sure your button is selected before opening the attribute inspector.

Do the same with the other button, naming one of the buttons High and the other one Low. Drag and resize the buttons to your liking. Run your app (CMD+R). It should look something like this:

Adding Text
We’ll need to some text for our score to the game. Open up the object library (CMD+Shift+L) and search for label.

Drag the label to the top of your view and change the text to Score: 0 using the attribute inspector (CMD+Option+4). I also changed the font color to white and the size to 40.

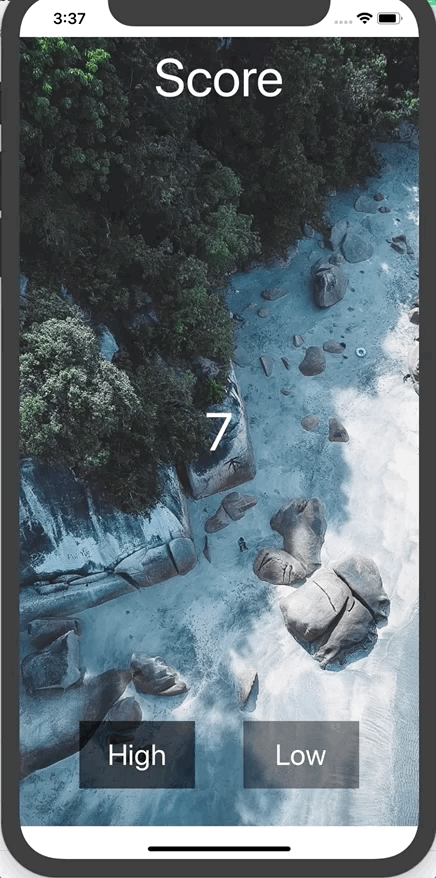
For now, we’re going to represent the cards with numbers from 1 to 13. 1 represents Ace. 11, 12, 13 represent Jack, Queen, King respectively. So let’s add a big zero to the middle of our screen.
Once again open up the object library (CMD+Shift+L) and drag a label onto the screen. Set the number to 0 and change the font size and color.

We’ll add the card images later on. Now it’s time to move onto coding.
Swift Programming
Swift is the programming language that iOS apps are written in. Don’t worry if you’ve never written any code before, Swift is a great language for beginners.
Hold option on your keyboard and click the file named ViewController.swift in your Project Navigator.
Project Navigator
You can open your project navigator using the keyboard shortcut CMD+1
You should see Xcode open up the file next to your user interface like this:

IBOutlets
You have your user interface on the left hand side and the code on the right hand side. Next we’ll connect our user interface to our code using an IBOutlet. Simply hold ctrl, click and drag the number label into your code.

Let go once you’ve dragged it into your code and name it cardLabel.

Now drag the score, high button and low button into your code using the same method. Your code should look like this afterwards:
import UIKit

class ViewController: UIViewController {

    @IBOutlet weak var cardLabel: UILabel!
    @IBOutlet weak var scoreLabel: UILabel!
    @IBOutlet weak var highButton: UIButton!
    @IBOutlet weak var lowButton: UIButton!

    override func viewDidLoad() {
        super.viewDidLoad()
        // Do any additional setup after loading the view, typically from a nib.
    }
}
Random Numbers
We need to get a random number to represent a new card being drawn. The number must be between 1 to 13. Since we have to represent Ace, Jack, Queen, King and the numbered cards.
This is quite easy to do in Swift, with the random function. Add this line of code in your viewDidLoad() function.
// Do any additional setup after loading the view, typically from a nib.
var currentCardValue = Int.random(in: 1 ... 13)
This line of code assigns a random number to the variable named currentCardValue. The keyword var in Swift defines a variable. The function Int.random(in: 1 ... 13) will generate a random integer from 2 to 14.
What’s a variable?
Variables are used to store information. This information can be referenced and changed over time. In our game, we use the variable named currentCardValue to track the current card being displayed.
It’s helpful to think of variables as containers that hold data. We can assign data to a variable using the = symbol. What’s an integer?
A data type in Swift. Integers are whole numbers that are not fractions.
Next we’re going to assign this number to our label. Add this line to your viewDidLoad()
cardLabel.text = String(currentCardValue)UILabels have a property called text that is a String type. You can assign text to the label by setting this property. We need to convert our curentCardValue to a String before setting it to the label.
What’s a String?
A data type in Swift. A sequence of characters.
Don’t worry too much about the data types for now, this will be explained in greater detail in a future tutorial.
Your ViewController.swift file should look like this now:
import UIKit

class ViewController: UIViewController {

    @IBOutlet weak var cardLabel: UILabel!
    @IBOutlet weak var scoreLabel: UILabel!
    @IBOutlet weak var highButton: UIButton!
    @IBOutlet weak var lowButton: UIButton!

    override func viewDidLoad() {
        super.viewDidLoad()
        // Do any additional setup after loading the view, typically from a nib.
        var currentCardValue = Int.random(in: 1 ... 13)
        cardLabel.text = String(currentCardValue)
    }
}
Go ahead and run your application (CMD+R). It should have a random number on the screen. If you re-run your application, a new number between 1-13 will appear.

Awesome! Now we need to make the number change based on button clicks. For this we’ll need to add IBAction of our buttons into our code. Click on one of the High or Low buttons and then open up its Connections Inspector. Keyboard shortcut is CMD+Option+6.

Drag the Touch Up Inside outlet in your code.

Let’s name these highButtonPressed and lowButtonPressed.
@IBAction func lowButtonPressed(_ sender: Any) {
}

@IBAction func highButtonPressed(_ sender: Any) {
}
Now we can add code that is activated when the buttons are pressed. Let’s wrap our previous random code into a function called randomizeCard and call it from viewDidLoad().
What’s a function?
Functions are containers of code that can be called multiple times. Think of them like reusable code.
We’ll go into greater detail in the next tutorial. For now just follow along.
This is what our randomizeCard will look like:
func randomizeCard() {
    var currentCardValue = Int.random(in: 1 ... 13)
    cardLabel.text = String(currentCardValue)
}
Call this function in each of our button IBActions we just made previously. The entire code should now look like this:
import UIKit

class ViewController: UIViewController {

    @IBOutlet weak var cardLabel: UILabel!
    @IBOutlet weak var scoreLabel: UILabel!
    @IBOutlet weak var highButton: UIButton!
    @IBOutlet weak var lowButton: UIButton!

    override func viewDidLoad() {
        super.viewDidLoad()
        randomizeCard()
        // Do any additional setup after loading the view, typically from a nib.
    }

    func randomizeCard() {
        var currentCardValue = Int.random(in: 1 ... 13)
        cardLabel.text = String(currentCardValue)
    }

    @IBAction func lowButtonPressed(_ sender: Any) {
        randomizeCard()
    }

    @IBAction func highButtonPressed(_ sender: Any) {
        randomizeCard()
    }
}
Run your iOS app (CMD+R) and click on the buttons. Button clicks should randomize the number now.
Scoring
Now that we have our random numbers working, we need to add game logic. Players get a point when they guess correctly if the next number is higher or lower. We’ll need to add some simple scoring logic to keep track of the points.
In order to determine if the user was correct or incorrect, we’ll need a variable to store the previous cards value. Let’s add this variable above our IBOutlets. We’ll set its value to 0 initially. We’ll also move our declaration of the currentCardValue to the top as well.
var previousCardValue = 0
var currentCardValue = 0
We need to update this every time randomizeCard is called. So we’ll modify the randomizeCard function:
func randomizeCard() {
    previousCardValue = currentCardValue
    currentCardValue = Int.random(in: 1 ... 13)
    cardLabel.text = String(currentCardValue)
}
To keep track of the score we’ll also need a score variable. Add this to the top of your file as well:
var score = 0Now lets add some simple logic to each our button presses to determine if we should increment the score or reset it.
For the low button, we’ll increment the score if the currentCardValue is lower than the previousCardValue, otherwise we’ll reset the score to 0.
@IBAction func lowButtonPressed(_ sender: Any) {
    randomizeCard()
    if currentCardValue < previousCardValue {
        increaseScore()
    } else {
        gameOver()
    }
}
Don’t worry, we’ll make the increaseScore() and gameOver() functions in a second!
For the high button, we’ll increment the score if the currentCardValue is higher than the previousCardValue, otherwise we’ll reset the score to 0.
@IBAction func highButtonPressed(_ sender: Any) {
    setLabelToRandomNumber()
    if currentCardValue >= previousCardValue {
        increaseScore()
    } else {
        gameOver()
    }
}
Now let’s create our increaseScore function. This function needs to update the text on the screen and the score variable:
func increaseScore() {
score = score + 1
scoreLabel.text = "Score: " + String(score)
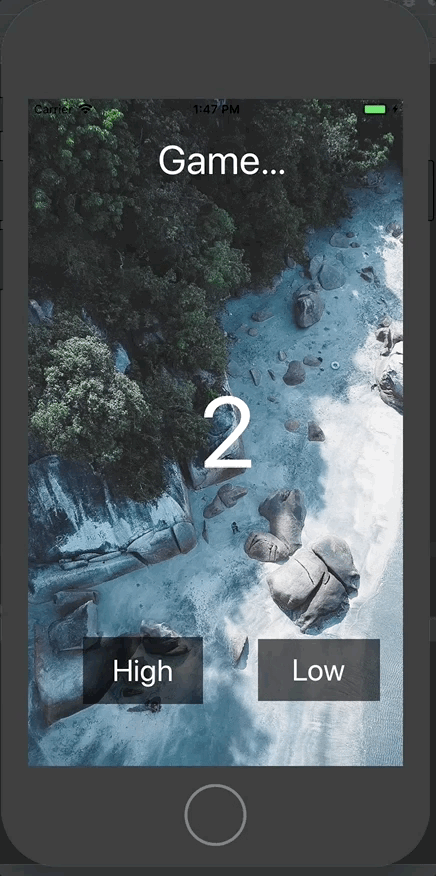
}For the gameOver function, we’ll reset the score and change the text to say “Game Over!”
func gameOver() {
    scoreLabel.text = "Game over!"
    score = 0
}
All together your code should look something like this:
import UIKit

class ViewController: UIViewController {
    var previousCardValue = 0
    var currentCardValue = 0
    var score = 0

    @IBOutlet weak var cardLabel: UILabel!
    @IBOutlet weak var scoreLabel: UILabel!
    @IBOutlet weak var highButton: UIButton!
    @IBOutlet weak var lowButton: UIButton!

    override func viewDidLoad() {
        super.viewDidLoad()
        randomizeCard()
        // Do any additional setup after loading the view, typically from a nib.
    }

    func randomizeCard() {
        previousCardValue = currentCardValue
        currentCardValue = Int.random(in: 1 ... 13)
        cardLabel.text = String(currentCardValue)
    }

    func increaseScore() {
        score = score + 1
        scoreLabel.text = "Score: " + String(score)
    }

    func gameOver() {
        scoreLabel.text = "Game over!"
        score = 0
    }

    @IBAction func lowButtonPressed(_ sender: Any) {
        randomizeCard()
        if currentCardValue < previousCardValue {
            increaseScore()
        } else {
            gameOver()
        }
    }

    @IBAction func highButtonPressed(_ sender: Any) {
        randomizeCard()
        if currentCardValue >= previousCardValue {
            increaseScore()
        } else {
            gameOver()
        }
    }
}
Run your application (CMD+R)! The game should now work.
You’ll notice the text can sometimes be cut off in our game. To fix this, simple open up the Main.storyboard and drag those views so they’re larger.

We’ll worry about centering these views perfectly in the next tutorial! Let’s finish off this game with card images.
Card Images
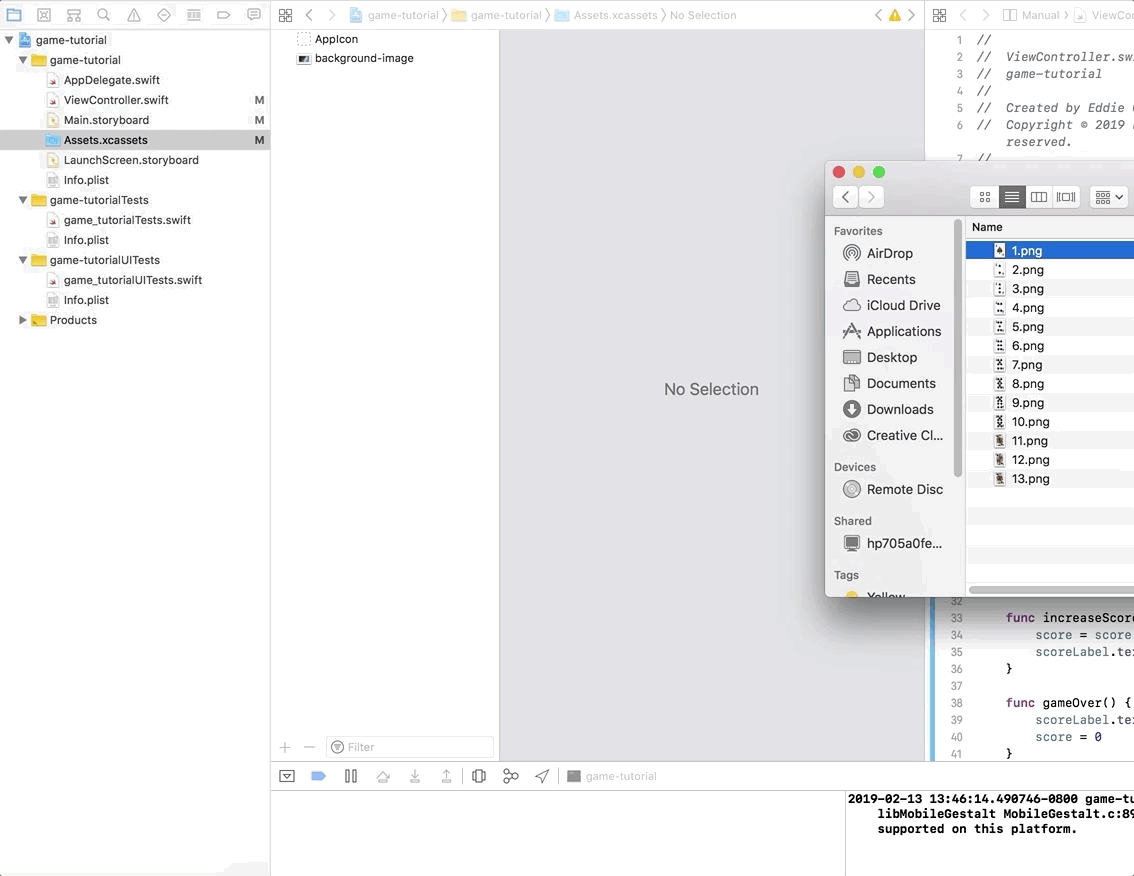
Now that we have our game working, the last part is to add the card images! I’ll be using these card images you can download here.
Once you have them downloaded, drag them from finder directly into your Assets.xcassets.
Now that we have our images, lets replace our big number label with an image view. Open up your Main.storyboard.
Click on your number in the middle and delete it. Then add an image view by opening up the object library (CMD+Shift+L) and dragging an image view onto your screen.
Position the image view and size it to your liking. Then drag it into your code. If you don’t have your code open, you can open it side-by-side by holding option and clicking ViewController.swift.

Delete the cardLabel from your code. We’re going to now set the image according to the number instead of changing the label text.
Modify your randomizeCard function to the following:
func randomizeCard() {
    previousCardValue = currentCardValue
    currentCardValue = Int.random(in: 1 ... 13)
    cardImageView.image = UIImage(named: String(currentCardValue))
}
All together your code should look like this:
import UIKit

class ViewController: UIViewController {
    var previousCardValue = 0
    var currentCardValue = 0
    var score = 0

    @IBOutlet weak var scoreLabel: UILabel!
    @IBOutlet weak var highButton: UIButton!
    @IBOutlet weak var lowButton: UIButton!
    @IBOutlet weak var cardImageView: UIImageView!

    override func viewDidLoad() {
        super.viewDidLoad()
        randomizeCard()
        // Do any additional setup after loading the view, typically from a nib.
    }

    func randomizeCard() {
        previousCardValue = currentCardValue
        currentCardValue = Int.random(in: 1 ... 13)
        cardImageView.image = UIImage(named: String(currentCardValue))
    }

    func increaseScore() {
        score = score + 1
        scoreLabel.text = "Score: " + String(score)
    }

    func gameOver() {
        scoreLabel.text = "Game over!"
        score = 0
    }

    @IBAction func lowButtonPressed(_ sender: Any) {
        randomizeCard()
        if currentCardValue < previousCardValue {
            increaseScore()
        } else {
            gameOver()
        }
    }

    @IBAction func highButtonPressed(_ sender: Any) {
        randomizeCard()
        if currentCardValue >= previousCardValue {
            increaseScore()
        } else {
            gameOver()
        }
    }
}
Run your game (CMD+R). Congrats, you’ve built an iOS game.
In the next tutorials, we’ll learn how to improve this game and strengthen our iOS fundamentals.

Eddy Chung
Similar Posts
- 10 Steps To Become An iOS Developer With No Experience
- Best Programming Languages To Learn For Mobile App Development
- Can you build an iOS app without an iPhone or iPad?
- Can I Develop iOS Apps On Windows?
- Colors & Font Styles In Xcode - Lesson 2
- Explanation & Solution for 'fatal error: unexpectedly found nil while unwrapping an Optional value'
- How long does it take to learn iOS development?
- Hello (SwiftUI) World - Beginner Tutorial For SwiftUI
- How To Make an iOS App For Beginners - Lesson 1 Hello World
- How To Make Gmail iOS App in Swift

The Complete iOS App Development Bootcamp
Disclosure: This website may contain affiliate links, meaning when you click the links and make a purchase, we receive a commission.