Beginners Guide To Learning Swift
This is the most common question I get from people learning iOS development. I’ve taught many beginners in coding both online and in person. I’ve been coding iOS professional for a couple of years, so here’s my advice on learning Swift.
How To Learn Swift?
- Focus on software fundamentals
- Complete Swift problems
- Build an application using Swift
These steps may seem simple but require a little dedication. Don’t worry, I’ll walk you through each point, step by step. This article will be for beginners.
Build an application using Swift
You should apply your newly learned skills to an app! At the end of my Swift free course I’ll provide an example project for you to work on.
This will help you apply all the skills you just learned into an iOS app you can build and share with your friends.
Code With Me
I will be giving step by step instructions for each part of this course. Although reading along is great, its much better if you follow along. Open up your Xcode and write out all the examples this course goes through. Remember, you learn coding by coding, not by reading.
Install Xcode and Create a Swift Playground
Installing Xcode is a simple process. Simply go to the App Store on your Mac and search for Xcode. Click the install button and wait.
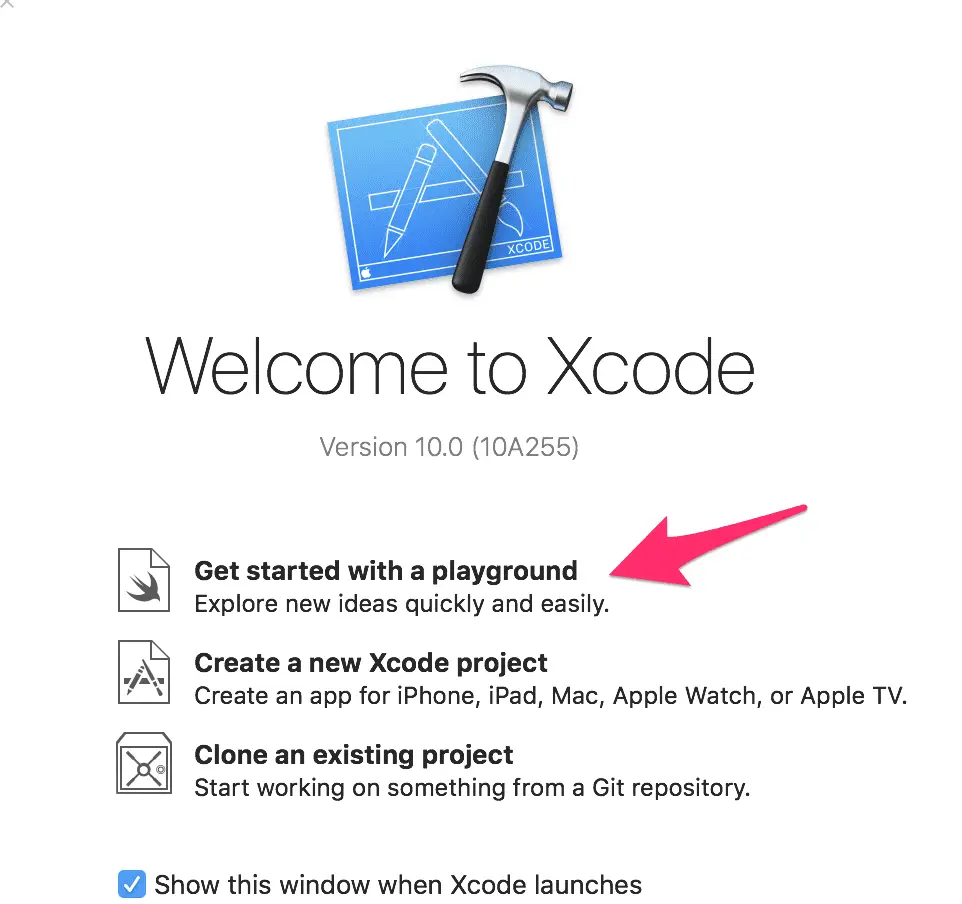
Once you have Xcode installed, open it up and create a new Playground.
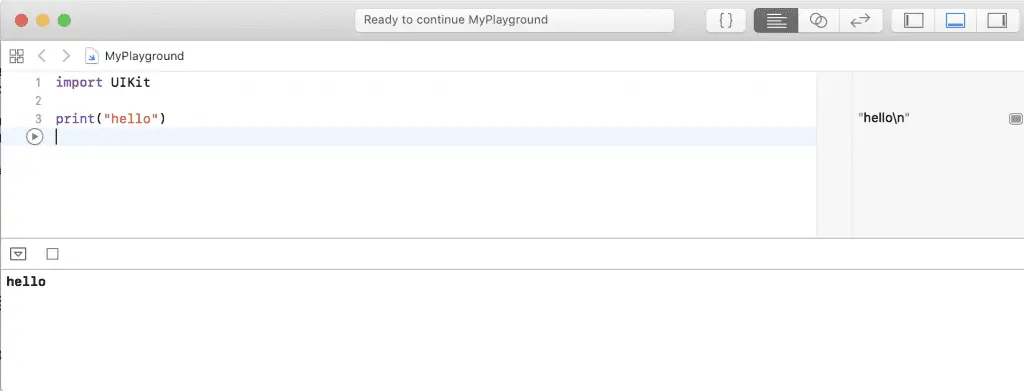
Type in the command print(“hello”) and then click the play button. Your console should output this below.
Awesome, now that you’ve got your Playground up and running we can begin learning some of the fundamentals of Swift.
Variables & Constants in Swift
Variables are used to keep track of information that changes and can be updated. For example – games will keep track of your high score and update it when it changes. Learning how to set and update these variables is a fundamental concept.
Variables are stored on the phone’s memory. Once you create a variable, you can then update it and access it throughout your program. In Swift, we create variables by using the keyword “var” followed by a label. You can use any label you want, for example, “highscore” or “timeremaining”. It’s best to use a label that describes the variable.
Once the variable is created, you can set it to a value. This value can be a string (text), integer, boolean (true or false), double (decimal), and some other types.
String Variables in Swift
In programming, we refer to text or a group of character as a string. String variables are very common in Swift. Let’s look at an example here.
var name = "Eddy"So on the left-hand side, you can see that we’ve defined our variable, using the keyword var followed by the name of the variable. In this case, I’ve named it name. After that, I put an equal sign and set it to the string “Eddy”. The equal sign here is an assignment operator. It assigns what’s on the right-hand sign to into whats on the left-hand side.
If we then add a print line to print out our variable, we can see the console output:
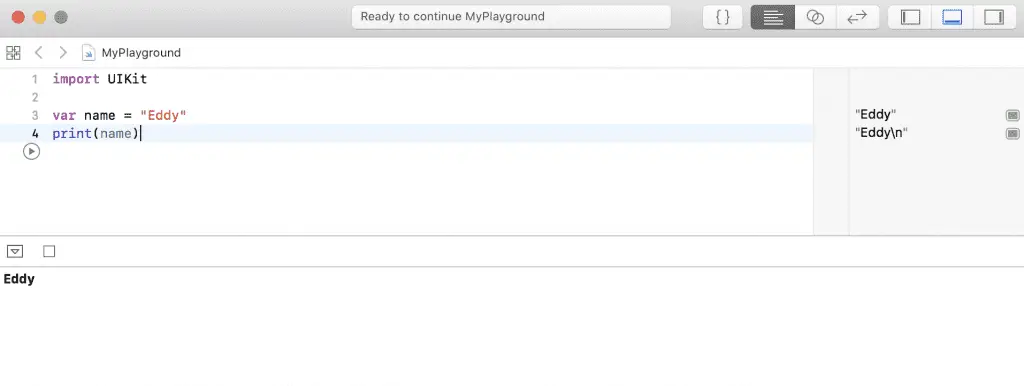
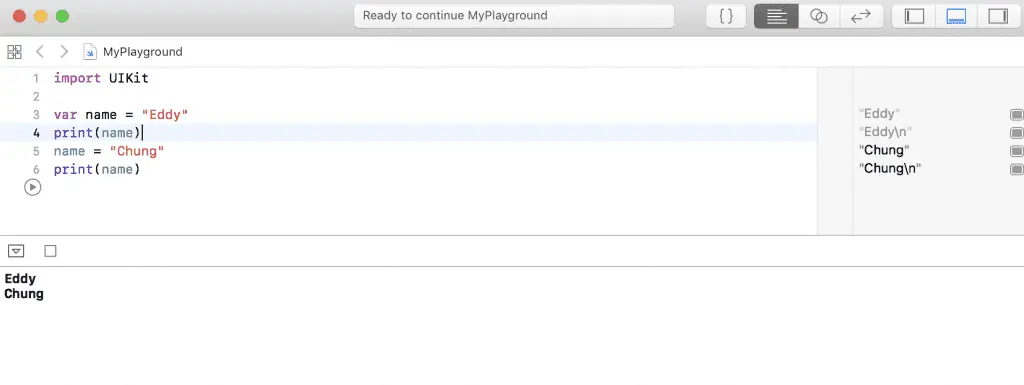
Now, let’s modify this variable and print it again, we can see the console output update accordingly.
var name = "Eddy"
print(name)
name = "Chung"
print(name)
Notice that we don’t have to type the var keyword again. Once a variable is made, we don’t need to recreate it. We can change the value of a variable as many times as we want. We also can access them by name, without the var keyword.This is what the console output will look like this:
Note that we can perform operations to two separate variables. Take a look at this code and guess what it will print out.
var firstName = "Eddy"
var lastName = "Chung"
print(firstName + " " + lastName)
Here’s what your console should output:
Now you’ve got the basics of String variables in Swift, it’s time to move onto the integers.
Integer Variables in Swift
Integers are our whole numbers (not fractional or decimal). They can be negative, positive or zero. Let’s jump into some examples!
var a = 999
var b = 1
print(a)
print(b)
print(a+b)
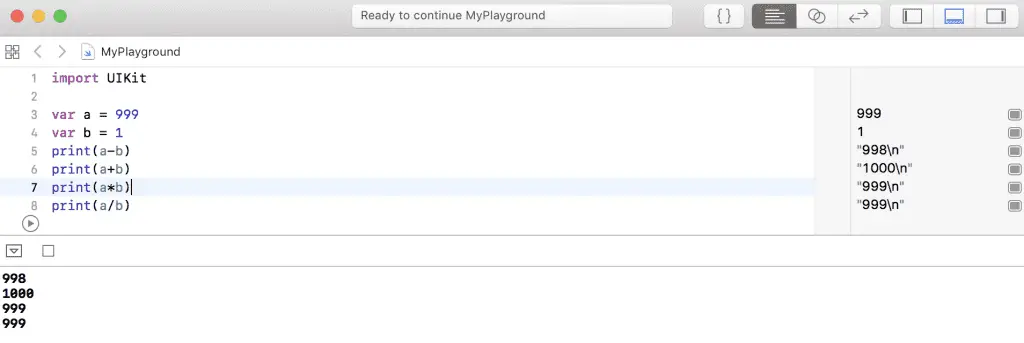
What do you think this will output? We’re assigning the value of 999 to a and then 1 to b. We’re printing a, then b, followed by a+b. Here’s the console output:
Let’s modify b before we add it together and see what happens:
var a = 999
var b = 1
print(a)
print(b)
b = -1
print(a+b)
What do you think our output will be? That’s right, the last line should print 998. Heres a screenshot to confirm:
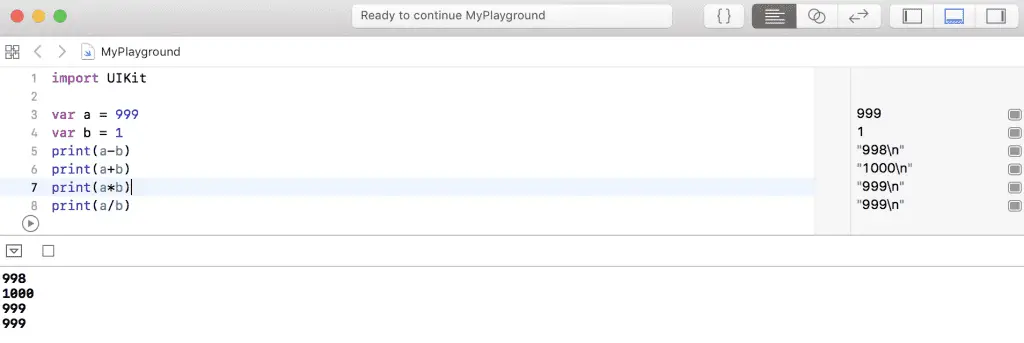
You can also perform other operations on integers, such as multiplication, division, and subtraction.
Boolean Variables in Swift
Booleans are variables that can only be two values: true or false. These variables are used for settings like the mute button & on/off switches. Let’s look at some examples.
var on = true
var off = false
print(on)
print(off)
print(on == off)
Here, I’ve set the boolean variable on to true and the boolean variable off to false. When we print on, the console will return true. Printing off will return false. The last line is a comparison statement, it says – does on equal off? This line will print out false. Here’s what your console output should look like:
Simple enough right? Now let’s look at combining multiple booleans together. Check out this code:
var on = true
var off = false
print(on || off)
print(on && off)
We’ve introduced two new operators here the OR symbol || and the AND symbol &&. Fear not – they’re simple operators. The OR symbol simply asks, are on or off true? Since on is true in this case – this print statement will return true.
The AND operator asks are on and off true? Since only on is true here, this will return false. Here’s the console output:
Almost done with booleans now, we’ve just got two more things to cover in this following example:
var mute = false
var on = true
print(on != mute)
print(mute)
mute.toggle()
print(mute)
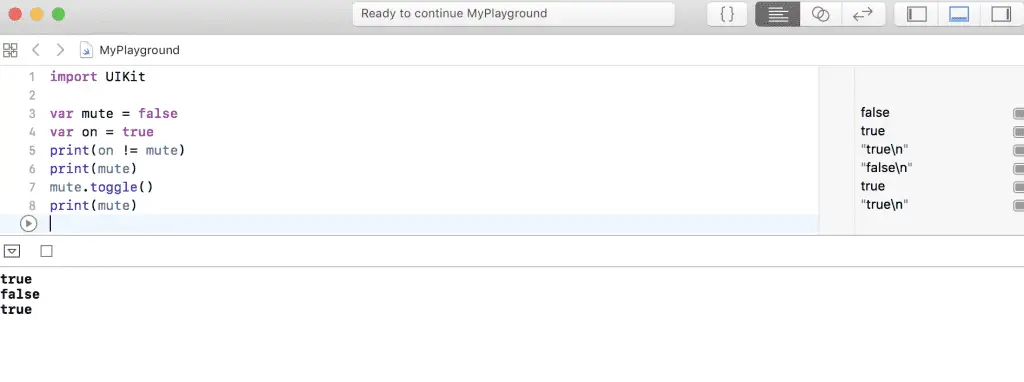
In the above example we introduced != and the .toggle() function. The != in programming means not equal to. So is on not equal to mute? Since mute is false and on is true, this statement will evaluate to true. The toggle function works as you would expect. It changes true to false or false to true. In this case, mute will first be printed as false, then printed as true. Here’s the console output:
Variable Types in Swift
Let’s talk about types in Swift. In our previous examples, we didn’t define any types and we let Swift decide them for us. This is because Swift has type inference. Another feature of the language is type safety. Let’s take a look at an example.
var str: String = "This is string"
var integer: Int = 12
These are typed variables. We can define types by using a colon : after the variable name. Why do we want to do this? Isn’t it obvious that str is a string and integer is an integer? In some cases yes, but in team environments or when you’ve written a lot of code, you want rules. Nobody should have to guess what type a variable should be.
The types we’ve looked at right now are quite simple, integers and strings, they can be much more complex types. Let’s take a look at how Swift type safety prevents these kinds of errors:
var str: String = "This is string"
var integer: Int = 12
str = 8
integer = "this is not an integer!"
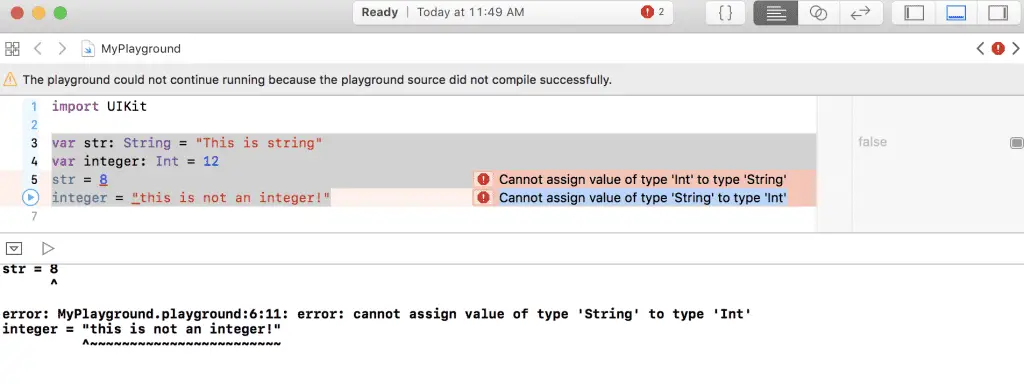
If you try to run this code, Xcode will give you errors. Complaining “Cannot assign value of type ‘Int’ to type ‘String’” and “Cannot assign value of type ‘String’ to type ‘Int’”. This is Swift’s type safety in action!
Constants
What are constants? Constants are like variables, except they cannot be changed once set. Here’s an example:
let str = "hi"
str = "hello"
If you try to run this code, Xcode will give you an error. “Cannot assign to value: ‘str’ is a ‘let’ constant”. Constants are great for values you don’t want to be changed (by yourself or by your teammates!). You may think, “I’ll never make that mistake of changing something I don’t want to!”. After you’ve written thousands of lines of code, it’s really easy to make this mistake. It is always better to code defensively.
That’s all we’ll learn about variables for now.
If Statements
If statements are the fundamental piece of logic. It’s the beginning of building a decision tree. If statements execute a certain section of code, if certain conditions are met. Let’s take a look at some examples:
var mute = false
if mute {
    print("muted!")
}
This code won’t print anything, because mute is currently false. The if statement evaluates to false and thus skips the print line.
Now let’s add an else to this statement.
var mute = false
if mute {
    print("muted!")
} else {
    print("not muted!")
}
This code will print the not muted statement, since mute evaluates to false.
Now lets toggle the mute variable and see what it prints. As you may have guessed, the code will print “muted!”.
var mute = false
mute.toggle()
if mute {
    print("muted!")
} else {
    print("not muted!")
}
Now there’s one more element of if statements in Swift we need to handle, the else if. Take a look at this slightly more complicated example:
var integer = 0
if integer > 0 {
    print("positive")
} else if integer < 0 {
    print("negative")
} else {
    print("0")
}
We’ve introduced a couple different things here. The comparator operators > and <. These represent greater than (>) and less than (<) respectively. Our if statement evaluates the logic as follows:
- Is this integer greater than zero? If so, print “positive”
- Is this this integer less than zero? If so print “negative”
- If it is neither of these options, the integer must be zero! So print “0”.
If we run the code with integer = 0, we can see this following result:
Try changing the integer variable to positive or negative numbers and see what gets printed out!
Scope
You’ll notice in our if statements, we’ve introduced curly brackets { }. This curly brackets represent different blocks of code that will be executed. This is important when defining your variables. Let’s look at an example that will give us an error.
var integer = 0
if integer > 0 {
    var output: String
    output = "positive"
} else if integer < 0 {
    output = "negative"
} else {
    output = "zero"
}
print(output)
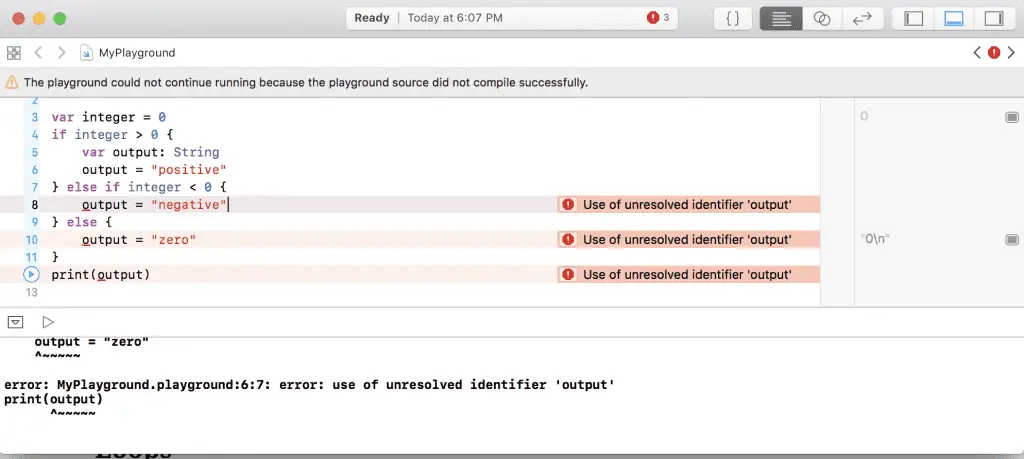
In the above example, we declare the variable output inside the curly brackets of the if statement. When we try to print it out or change it in the other parts of the if statement, Xcode complains that it cannot find it. This is expected – when you define something inside curly braces, it will only exist inside those curly braces. See the errors below:
How do we fix this error? We have to output to the top of our Swift file. That way it can be modified by every part of the if statement and printed at the end of our file.
var output: String = ""
var integer = 0
if integer > 0 {
    output = "positive"
} else if integer < 0 {
    output = "negative"
} else {
    output = "zero"
}
print(output)
We’ll be discussing scope more often throughout each chapter – so don’t worry you’ll get more practice with this.
Loops
Loops are great for when you need to do a repeated action. It enables you to do the same thing multiple times without typing out the same code over and over. Let’s take a look at an example:
for i in 1...3 {
    print("hello")
}
This for loop will run 3 times and print “hello” each of those runs. Let’s take a loop at this output:
Now let’s try printing out our iterator, the variable i that we defined in the for loop function.
for i in 1...3 {
    print(i)
}
What do you think this one will print? If you guess 1, 2, 3 – you’re correct 🙂
We can do more complex tasks inside the for loop such as adding together numbers. Let’s take a look at this example:
var sum = 0
for i in 1...3 {
    sum = sum + 2
    print(sum)
}
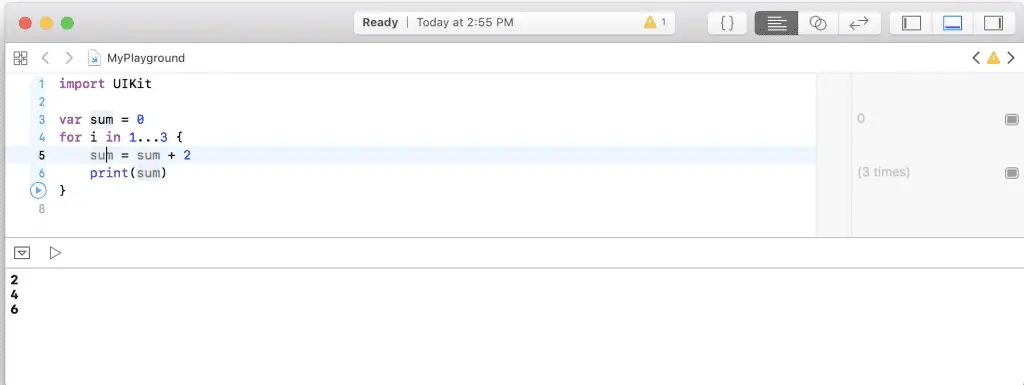
In this example, we start with sum at 0. Then for each iteration of the loop, we add two. This should result in the sum being printed as 2, 4, 6:
What would happen if we moved the sum variable inside the loop like so:
for i in 1...3 {
    var sum = 0
    sum = sum + 2
    print(sum)
}
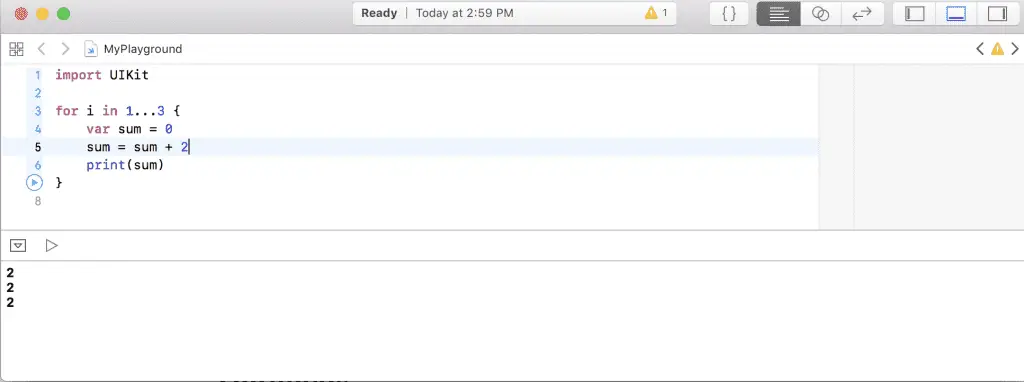
In this above code, we’re setting the sum to 0 every iteration. Since the variable is reset every loop, this will just print 2 three times.
Also, since the sum is inside this for loop, we will not able to print it outside of this for loop. It will result in a “use of unresolved identifier” error:
Now there’s more kind loop we’ll need to cover before moving on. This kind of loop is called a while loop. This is also known as a conditional loop, as it will continue to run based on a condition. Let’s take a look at an example:
var sum = 0
while sum < 10 {
    sum = sum + 2
    print(sum)
}
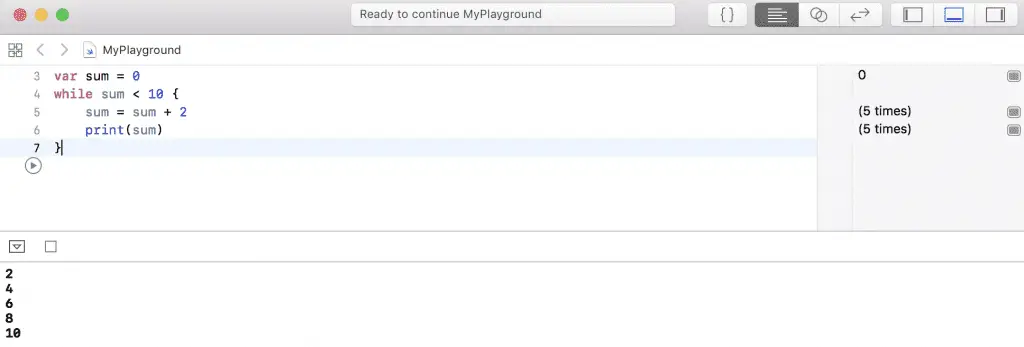
In this example, the loop will run as long as the condition sum < 10 is true. That means sum will be printed as 2, 4, 6, 8, 10. It won’t go to 12, because the loop will not execute when sum is equal to 10, only when it is less. Heres the output:
Now you know the basics of loops in Swift. It’s time to move onto our next topic, functions.
Functions
Functions combine a bunch of lines of code into one line of code. They can be thought of a way of encapsulating code. Here’s a simple example, using our previous loop code.
func printEvens() {
    var sum = 0
    for i in 1...3 {
        sum = sum + 2
        print(sum)
    }
}
If we run our code now, nothing will be happen, thats because we need to call functions in order for them to execute. Let’s add another line to call this printEvens function:
func printEvens() {
    var sum = 0
    for i in 1...3 {
        sum = sum + 2
        print(sum)
    }
}
printEvens()
Now if you run your code, you should see 2, 4, 6 printed out. What happened here? Let’s break it down:
- We defined out function called printEvens()
- We then wrote code inside this function within its curly brackets
- Lastly, we called this function using its name printEvens().
Here’s what your console output should look like:
Now let’s learning something new, function parameters. Function parameters allow us to input some data into our function. Let’s look at an example:
func printEvens(numberOfTimes: Int) {
    var sum = 0
    for i in 1...numberOfTimes {
        sum = sum + 2
        print(sum)
    }
}
In the above example, you can see that we’ve added a parameter to our function. Parameters go inside the rounded brackets and its type is separated by a colon. In this example, we’ve added the parameter numberOfTimes with the type of Int. We’ve also used this parameter in our for loop inside the function.
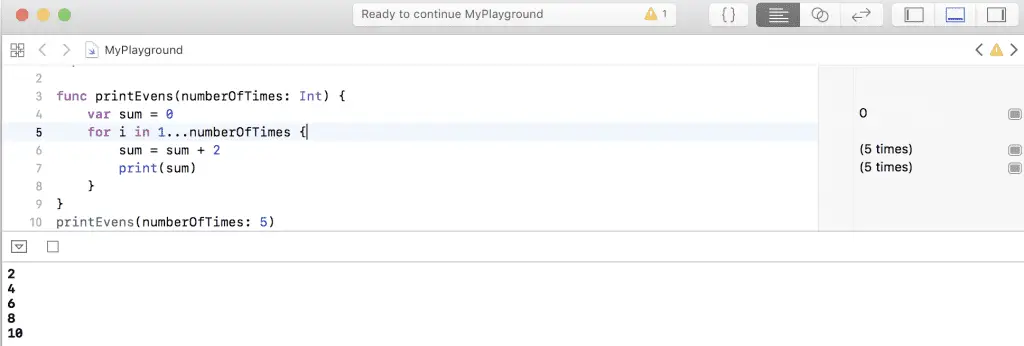
Let’s see what happens when we call printEvens(numberOfTimes: 5):
It printed 5 even numbers, as expected. The function used the value we passed in when executing itself.
The next thing you’ll need to learn is return values. Parameters let us provide the function with some input data, while return values allow functions to provide us with output. Here’s an example building on the previous:
func printEvens(numberOfTimes: Int) -> Int {
    var sum = 0
    for i in 1...numberOfTimes {
        sum = sum + 2
        print(sum)
    }
    return sum - 10
}
let sum = printEvens(numberOfTimes: 5)
print(sum)
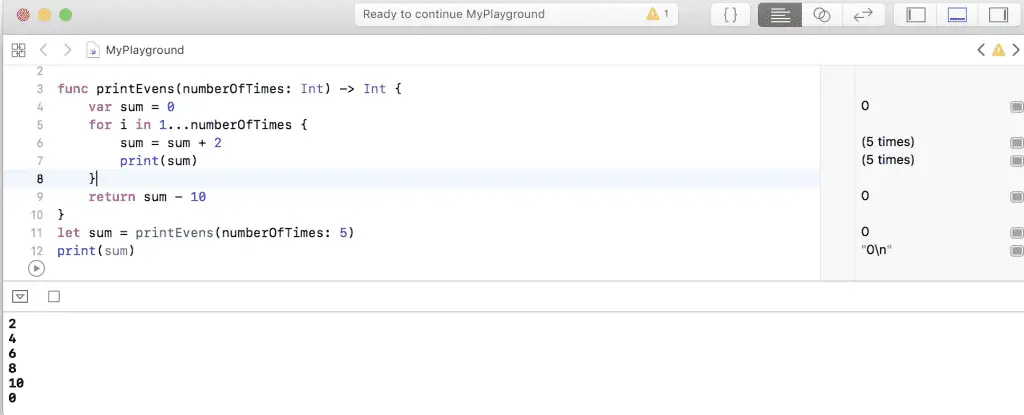
In this example, we added an arrow (->) after our parameters closing round bracket. Then we defined the return type to be an integer. What do you think this function will print? It will first print all 5 even numbers, then it will return the sum – 10. Then it will print the sum. So it should be print 2, 4, 6, 8, 10, 0. Heres a screenshot of the output:
Another thing I want to teach you in this function chapter is having unnamed parameters. What if I just wanted to call printEvens(5) instead of printEvens(numberOfTimes: 5)? To do this we’ll add an underscore to our parameter definition like so:
func printEvens(_ numberOfTimes: Int) -> Int {
    var sum = 0
    for i in 1...numberOfTimes {
        sum = sum + 2
        print(sum)
    }
    return sum - 10
}
let sum = printEvens(5)
print(sum)
This is used often when there are few or only one parameter.
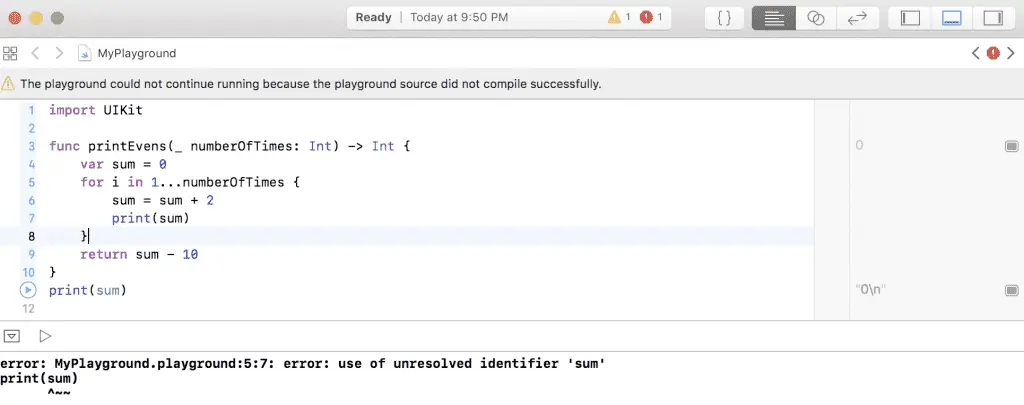
Let’s talk about scope, an important topic for any beginner to master. If we define any variables inside a function – that is, within its curly brackets, it is not accessible outside of it. Take a look at this example:
Since sum is only defined inside the function here, it cannot be printed outside the function.
Here are some other benefits of using functions:
- Call a function as many times as you want! Save time instead of writing the same code over and over again
- Helps break our code into smaller more manageable (and testable!) chunks
- Easily allows for collaboration. Teammates just have to know the function name, parameters and its return type. They don’t have to know all the inner workings of the function
- Only need to change the code in one spot. You can change the behavior of all function calls by changing the code in the function. This is extremely powerful.
Functions are used extensively throughout software development, not only Swift. It’s important you wrap your head around this concept. This is one of the key tools that allows developers to have impact at very large scales.
Classes
Classes are abstract structures used to represent data. Let’s say you wanted to create a music application and needed to define variables for the song name, duration and the artist. Without classes, you would define it something like this:
var songName1 = "Awesome Song"
var songArtist1 = "DJ Eddie"
var duration1 = 2.5

var songName2 = "OK Song"
var songArtist2 = "Super Duper Artist"
var duration2 = 3.1
Wouldn’t it be nice if there were a way to group name, artist and duration together? Well there is, its a computer science concept called classes. Check out this class example:
class Song {
    var name = ""
    var artist = ""
    var duration = 0.0
}
We’ve defined the Song class by using the class keyword, followed by the class names and then the properties of the class inside the curly braces {}.
This song class has three properties: name, artist and duration. Let’s take a look another example:
class Song {
    var name = ""
    var artist = ""
    var duration = 0.0
}

var topSong = Song()
topSong.name = "Jamming!"
topSong.artist = "Lil Eddy"
topSong.duration = 3.2
In this above example, I created an instance of the Song class and then assign it to the topSong variable. An instance is like one copy of the class. The class definition above acts like a blueprint.
We can create multiple instances of the same class like so:
class Song {
    var name = ""
    var artist = ""
    var duration = 0.0
}

var topSong = Song()
topSong.name = "Jamming!"
topSong.artist = "Lil Eddy"
topSong.duration = 3.2

var nextSong = Song()
nextSong.name = "peanut butter time"
nextSong.artist = "Big Eddy"
nextSong.duration = 2.2
Now we have two instances of the song class – topSong and nextSong. Let’s some functionality to our class by adding a like counter and a way to increment the total number of likes.
class Song {
    var name = ""
    var artist = ""
    var duration = 0.0
    var totalLikes = 0

    func addLike() {
        totalLikes = totalLikes + 1
    }
}
That’s right! We added a function into our class. If you haven’t read the function chapter make sure you go back and check it out.
Now let’s add likes to our two song instances:
var topSong = Song()
topSong.name = "Jamming!"
topSong.artist = "Lil Eddy"
topSong.duration = 3.2
topSong.addLike()
topSong.addLike()
topSong.addLike()

var nextSong = Song()
nextSong.name = "peanut butter time"
nextSong.artist = "Big Eddy"
nextSong.duration = 2.2
nextSong.addLike()

print(topSong.totalLikes)
print(nextSong.totalLikes)
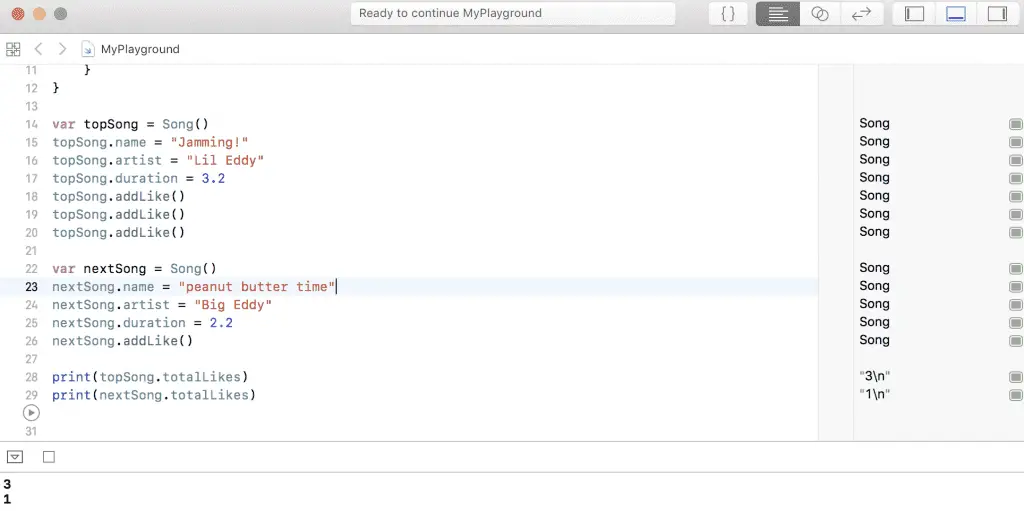
We called add like three times to the topSong and just once to the nextSong. Logically this means we should see 3 and 1 printed out in our console. Check it out:
Notice that each instance of the class keeps track of its number of likes completely separately.
Initializers
Let’s learn about initializers for classes. Initializers provide the class with some data in order to create an instance. Building off the previous example, we’re going to write an initializer for our Song class. Let’s take a look at this example:
class Song {
    var name: String
    var artist: String
    var duration: Double
    var totalLikes: Int

    init(name: String, artist: String, duration: Double, totalLikes: Int) {
        self.name = name
        self.artist = artist
        self.duration = duration
        self.totalLikes = totalLikes
    }
    func addLike() {
        totalLikes = totalLikes + 1
    }
}
You can see the initializers contains parameters, just like a function. It returns an instance of the class, so you don’t have to type in the return type in this init function.
The init in the above example is very simple, it simply assigns the parameters pass in to the properties of the class. The keyword “self.” is used to indicate that we want to assign it to the properties. “Self.” is not needed if the names of the properties and parameters are different, only if they’re the same.
So, using our new class we can write our previous code like so:
var topSong = Song(name: "Jamming!", artist: "Lil Eddy", duration: 3.2, totalLikes: 0)
topSong.addLike()
topSong.addLike()
topSong.addLike()

var nextSong = Song(name: "Peanut Butter Time", artist: "Big Eddy", duration: 2.2, totalLikes: 0)
nextSong.addLike()

print(topSong.totalLikes)
print(nextSong.totalLikes)
The song name, artist, duration and total likes are now initialized when each of the topSong and nextSong objects are created.
Inheritance
Inheritance is a special feature of classes. This feature exists in Swift but also exists in many other programming languages. When a class inherits from another class, the class it considered a subclass, and the class it inherits from is the superclass. Let’s look at an example to make this more clear:
class Vehicle {
    var currentSpeed = 0.0
    var description: String {
        return "traveling at \(currentSpeed) miles per hour"
    }
    func makeNoise() {
        // do nothing
    }
}
This is the vehicle base class. Base classes are any classes that do not inherit from another class. You can see that it describes some basic properties of a vehicle, including speed & description. It also has an empty makeNoise function that can be implemented in subclasses.
Let’s create an instance of the vehicle class and use it in this example:
This worked as expected. Now, let’s look at making a subclass that inherits from this vehicle base class.
class Bicycle: Vehicle {
    var hasBasket = false
}
This bicyle class has the super class Vehicle. You can see it has a super class by the colon after the class name definition. We’ve added an extra property here called “hasBasket” with the default value being false. However, this class inherits all the values from its super class as well. So it can do the same things as its super class:
let someBicycle = Bicycle()
someBicycle.currentSpeed = 5.0
print(someBicycle.description)
There’s one more thing you’ll need to learn about inheritance, overriding. Remember in our class vehicles we have an empty function called makeNoise()? Lets implement that in our bicycle class by using the keyword override.
class Bicycle: Vehicle {
    var hasBasket = false
    override func makeNoise() {
        print("ring ring!")
    }
}
That’s the fundamentals of classes. Let’s move onto the next topic.
Optionals
Optionals a great feature of Swift, it tells you that this variable may be not initialized yet. We write optionals using the character ? – the question mark. For example lets take a look at these two variables:
var integer: Int = 5
var optionalInteger: Int?
We’ve defined an integer and an optional integer variable. The integer variable is always guaranteed to have a value while the optional variable is not (in other words, it could be nil).
Try to define the integer variable without setting its value. The compiler will complain with the error:
error: variables currently must have an initial value when entered at the top level of the REPLWhy is this useful? For example, let’s say you’re trying to add these two integers together. How should the code behave for adding a nonexistent integer (in our case optional integer). This behavior is undefined and in other languages will result in a crash. In Swift, the code won’t compile and tell us there’s an error. It’s great to catch these errors while coding as opposed to when our application is running. This code won’t compile as Xcode will warn us:
var integer: Int
var optionalInteger: Int?

print(integer + optionalInteger)
Xcode should give you the error:
Value of optional type 'Int?' must be unwrapped to a value of type 'Int'You can put an exclamation mark ! to force unwrap the variable, but this runs the whole safety feature of the Swift language. A much better way is to use an if let statement, to verify that the variable is not nil:
if let optionalInteger = optionalInteger {
    print(integer + optionalInteger)
} else {
    print("optional integer is nil!")
}
Arrays
Arrays are a group of variables and an essential data type to understand. Let’s look at an example here:
var fruits = ["apple", "banana", "orange"]Arrays allow you to group similar variables together. You can then add to these items, loop through them, or remove from the array. There’s a ton of different functions that arrays have. You’ll learn more as you get coding, but try to get familiar with this example:
var fruits = ["apple", "banana", "orange"]

print(fruits[0])
print(fruits[1])
print(fruits[2])

for fruit in fruits {
    print(fruit)
}

fruits.append("mango")
print(fruits[3])
fruits.removeLast()
print(fruits.count)
Individual array elements can be accessed by using square brackets and the index of the element you want. The index is always a non-negative integer that starts at 0. In the above example printing fruits[0] will return “apple”.
You can iterate through elements in a array using a for loop as shown in the above example. I named the iterator variable “fruit” (singular), however, you can name it anything.
Lastly you can append and remove from an array. I appended the fruit “mango”, then I removed it using the function removeLast().
Once you’ve familiar with the array data type, its time to move onto the next chapter.
Dictionaries
Dictionaries are another type you should know. It provides fast access to elements. Each element is defined by a key and each key has a value. Here’s an example:
var personInformation = ["name": "Eddy",
                         "job": "iOS Engineer",
                         "age": "25"]

print(personInformation["name"])
print(personInformation["job"])
print(personInformation["age"])
Dictionaries share some similar characteristics to arrays. You can iterate through them, append to them and add values to them. Keys can be any type and values can also be any type.
Why would you use this? The most obvious case is for a language dictionary. For example, if you needed to look up a word, you could just use the call dictionary[“word”] and it could return you a string with a definition of that word. If you stored this in an array, you’d have to search through the entire array to find the definition.
Eddy Chung
Similar Posts
- 10 Steps To Become An iOS Developer With No Experience
- Best Programming Languages To Learn For Mobile App Development
- Can you build an iOS app without an iPhone or iPad?
- Can I Develop iOS Apps On Windows?
- Colors & Font Styles In Xcode - Lesson 2
- Explanation & Solution for 'fatal error: unexpectedly found nil while unwrapping an Optional value'
- How long does it take to learn iOS development?
- Hello (SwiftUI) World - Beginner Tutorial For SwiftUI
- How To Make an iOS App For Beginners - Lesson 1 Hello World
- How To Make Gmail iOS App in Swift

The Complete iOS App Development Bootcamp
Disclosure: This website may contain affiliate links, meaning when you click the links and make a purchase, we receive a commission.
On this page
- Build an application using Swift
- Code With Me
- Install Xcode and Create a Swift Playground
- Variables & Constants in Swift
- String Variables in Swift
- Integer Variables in Swift
- Boolean Variables in Swift
- Variable Types in Swift
- Constants
- If Statements
- Scope
- Loops
- Functions
- Classes
- Initializers
- Inheritance
- Optionals
- Arrays
- Dictionaries
