How To Access The Camera & Photo Library In Swift
Accessing the camera or photo library is essential for many iOS apps these days.
It allows users to share their images and take new ones. This is a popular feature of many social media, augmented reality and scanner type of iOS apps.
How To Access The Camera In Swift
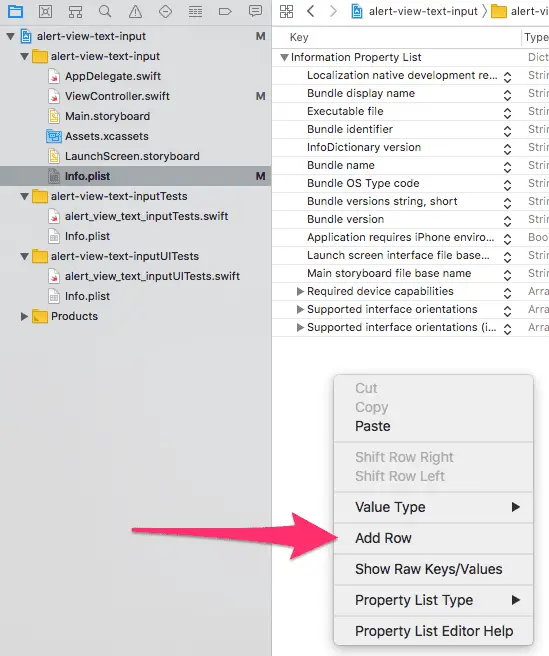
To access the camera in Swift, we first must ask the user for permission. Open up your Info.plist file from your Project Navigator. Then right click and click Add Row.
In the Information Property List column, paste in NSCameraUsageDescription and hit enter. The column should automatically change to “Privacy - Camera Usage Description”.
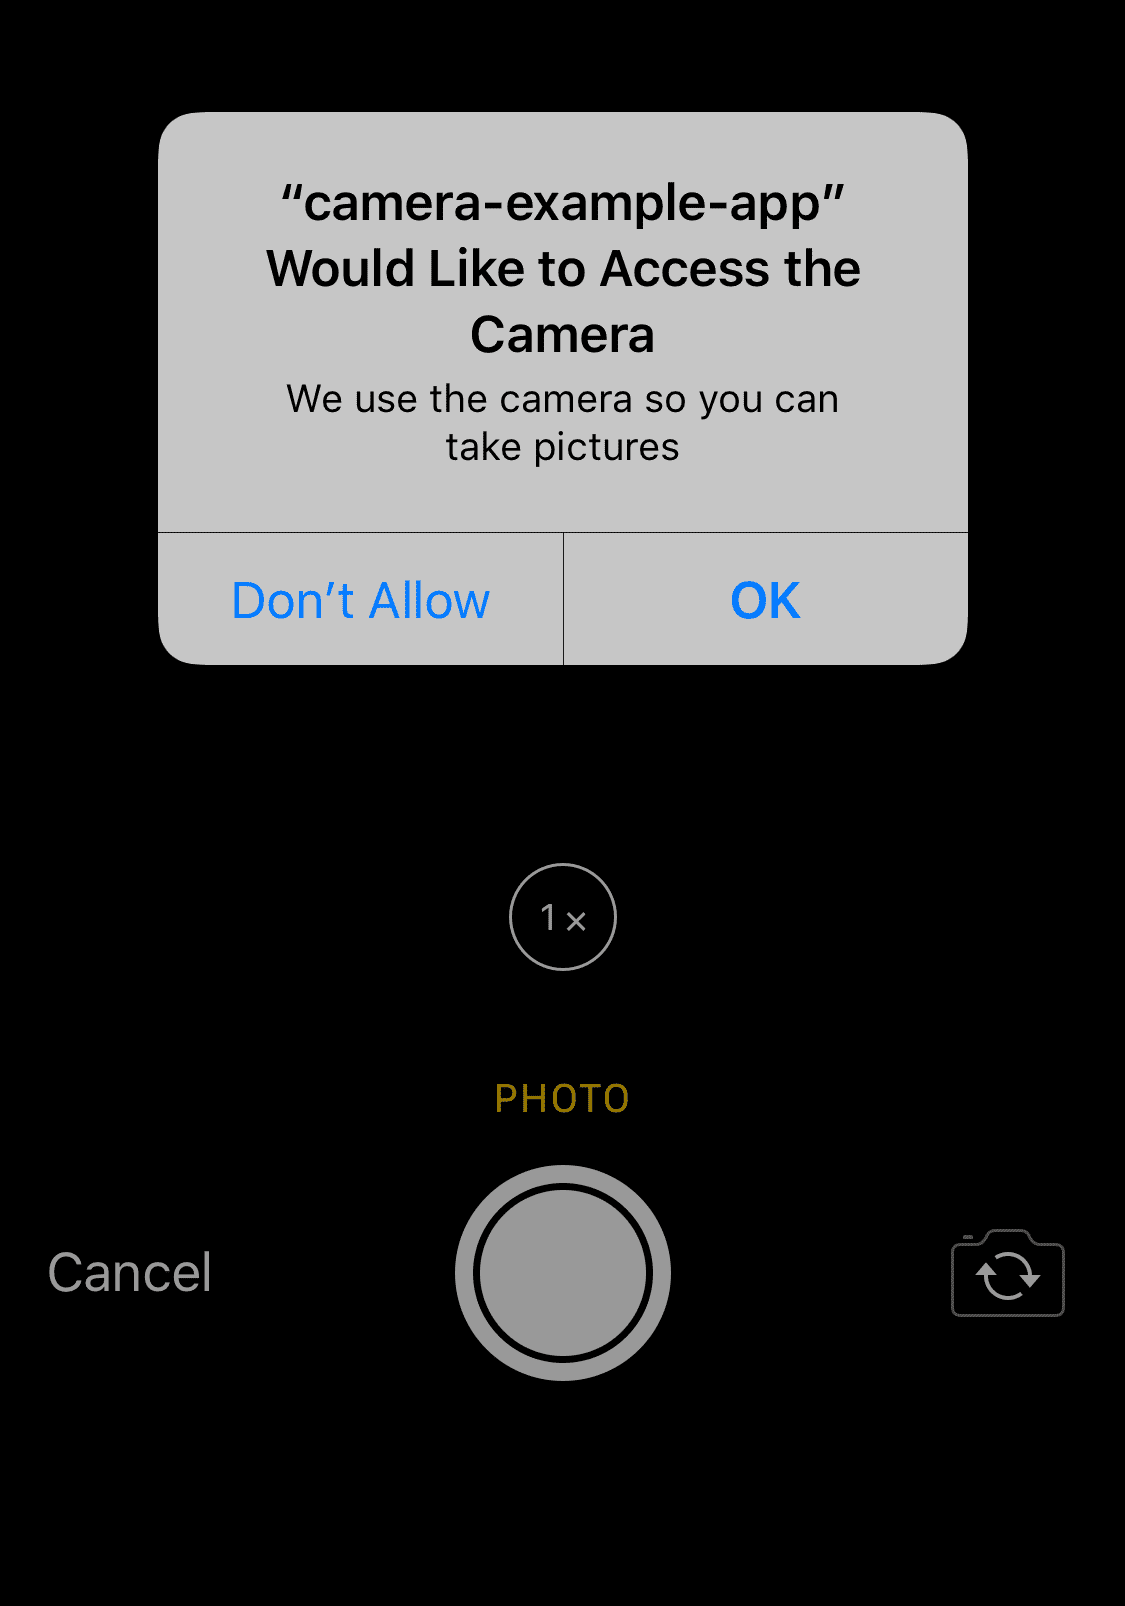
Make sure the Type column is set to String and then write a message in the value column. This message will appear when you’re asking for camera permissions from the user in a pop-up.
I’m going to type in an example value “We need to access your camera to take photos”
Now we can go back to the code. In our view controller, inside the viewDidAppear function, we’ll use the following code:
class ViewController: UIViewController, UIImagePickerControllerDelegate, UINavigationControllerDelegate {
    override func viewDidAppear(_ animated: Bool) {
        if UIImagePickerController.isSourceTypeAvailable(.camera) {
            let imagePickerController = UIImagePickerController()
            imagePickerController.delegate = self;
            imagePickerController.sourceType = .camera
            self.present(imagePickerController, animated: true, completion: nil)
        }
    }
}
You’ll notice that our view controller subclasses UIImagePickerControllerDelegate and UINavigationControllerDelegate, both of these are required.
In our viewDidAppear() we first check if the camera is available, then we create a new image picker controller, set its delegate to this view controller, the source type to camera and then present it.
The pop up looks like this:
How To Use Image From Camera Swift
To use the image the user captured on the app we’ll have to implement one of the delegate methods. For the purposes of this tutorial, we have an UIImageView named imageView. We’ll set imageView to the user’s captured image.
The method we’ll have to implement is as follows:
func imagePickerController(_ picker: UIImagePickerController, didFinishPickingMediaWithInfo info: [UIImagePickerController.InfoKey : Any]) {
    let image = info[UIImagePickerController.InfoKey.originalImage] as? UIImage
    imageView.image = image
    self.dismiss(animated: true, completion: nil)
}
You grab the original image from the UIImagePicker, then set imageView to this newly captured view and finally dismiss the camera view.
Here’s the full app in action:
If you like to add custom behavior when the user cancels taking a photo you can implement the imagePickerControllerDidCancel method. Here can you send the user a message or record that the user didn’t upload an image.
func imagePickerControllerDidCancel(_ picker: UIImagePickerController) {
    self.dismiss(animated: true, completion: nil)
}
The full code with the image view and some minor logic to only upload one photo is below:
class ViewController: UIViewController, UIImagePickerControllerDelegate, UINavigationControllerDelegate {

    @IBOutlet weak var imageView: UIImageView!

    var pickedImage = false

    override func viewDidAppear(_ animated: Bool) {
        if UIImagePickerController.isSourceTypeAvailable(.camera) && !pickedImage {
            let imagePickerController = UIImagePickerController()
            imagePickerController.delegate = self
            imagePickerController.sourceType = .camera
            self.present(imagePickerController, animated: true, completion: nil)
            pickedImage = true
        }
    }

    func imagePickerControllerDidCancel(_ picker: UIImagePickerController) {
        self.dismiss(animated: true, completion: nil)
    }

    func imagePickerController(_ picker: UIImagePickerController, didFinishPickingMediaWithInfo info: [UIImagePickerController.InfoKey : Any]) {
        let image = info[UIImagePickerController.InfoKey.originalImage] as? UIImage
        imageView.image = image
        self.dismiss(animated: true, completion: nil)
    }
}
How To Access The Photo Library In Swift
Accessing the photo library is similar to accessing the camera in Swift.
You’ll first need to add a new row to your Info.plist file with the property name NSPhotoLibraryUsageDescription.
Then you can simply change the above code replacing .camera with .photoLibrary. Your final code should look something like this:
class ViewController: UIViewController, UIImagePickerControllerDelegate, UINavigationControllerDelegate {
    override func viewDidAppear(_ animated: Bool) {
        if UIImagePickerController.isSourceTypeAvailable(.photoLibrary) {
            let imagePickerController = UIImagePickerController()
            imagePickerController.delegate = self;
            imagePickerController.sourceType = .photoLibrary
            self.present(imagePickerController, animated: true, completion: nil)
        }
    }
}
The full code to upload an image from the user’s library and display it is below:
class ViewController: UIViewController, UIImagePickerControllerDelegate, UINavigationControllerDelegate {

    @IBOutlet weak var imageView: UIImageView!

    var pickedImage = false

    override func viewDidAppear(_ animated: Bool) {
        if UIImagePickerController.isSourceTypeAvailable(.photoLibrary) && !pickedImage {
            let imagePickerController = UIImagePickerController()
            imagePickerController.delegate = self
            imagePickerController.sourceType = .photoLibrary
            self.present(imagePickerController, animated: true, completion: nil)
            pickedImage = true
        }
    }

    func imagePickerControllerDidCancel(_ picker: UIImagePickerController) {
        self.dismiss(animated: true, completion: nil)
    }

    func imagePickerController(_ picker: UIImagePickerController, didFinishPickingMediaWithInfo info: [UIImagePickerController.InfoKey : Any]) {
        let image = info[UIImagePickerController.InfoKey.originalImage] as? UIImage
        imageView.image = image
        self.dismiss(animated: true, completion: nil)
    }
}Eddy Chung
Similar Posts
- Best Backend For iOS App
- 10 Steps To Become An iOS Developer With No Experience
- Build An Alert Dialog Box With Text Input In Swift
- The Best Tools For iOS Developers
- Best Programming Languages To Learn For Mobile App Development
- Solution: Can't Update Xcode From App Store, Hangs Indefinitely
- Can you build an iOS app without an iPhone or iPad?
- Can I Develop iOS Apps On Windows?
- Colors & Font Styles In Xcode - Lesson 2
- didSelectRowAtIndexPath not being called

The Complete iOS App Development Bootcamp
Disclosure: This website may contain affiliate links, meaning when you click the links and make a purchase, we receive a commission.


